Aug 27, 2009

Multiple Document Interface (MDI) form

Multiple Document Interface (MDI) form –

MDI form closely resembles a standard form with one major difference – the client area of an MDI form acts as a kind of container for other forms. It means that an MDI form also called an MDI parent form, can display MDI children in it, which is how the multiple document interfaces work.
Creating MDI Applications :
MDI forms are useful when the users want to open more than one document at a time.


Creating MDI Child Windows in Code :
For adding MDI child windows into our MDI parent form, first I’ll create a form class MDIChild and then i’ll create MDI child windows by creating and displaying a new object of the class each time the user clicks on New Option in File Menu bar in application. To make that new form object a child window of the MDI parent, MDIparent, we have to set its MdiParent property to the main window which also sets its IsMdiChild property to True. For working with number of child windows we need to store them in a array of forms.
Steps :
1. Add RichtextBox to MDIChild (to second form)
2. Set Dock property of Richtextbox to fill by clicking on the square shaped button in the properties window


3. Add following code in MDIParent.cs
using System;
using System.Collections.Generic;
using System.ComponentModel;
using System.Data;
using System.Drawing;
using System.Linq;
using System.Text;
using System.Windows.Forms;
namespace MyWinForms
{
public partial class MDIParent : Form
{
int NumberofForms = 0;
MDIChild[] Forms = new MDIChild[11];
public MDIParent()
{
InitializeComponent();
}
private void MDIParent_Load(object sender, EventArgs e)
{
}
private void newToolStripMenuItem_Click(object sender, EventArgs e)
{
NumberofForms +=1;
Forms[NumberofForms] = new MDIChild();
Forms[NumberofForms].Text = "Document" + Convert.ToString(NumberofForms);
Forms[NumberofForms].MdiParent = this;
Forms[NumberofForms].Show();
}
}
}
4. Finally Run the application. Click on File -> New


Aug 18, 2009

Windows Forms : Use Drag-and-Drop

Windows Forms : Use Drag-and-Drop


This code will show you how to implement drag and drop functionality in a
Windows Form. Drag-and-drop is one of the fundamental metaphors underlying the
Microsoft Windows family of operating systems. Users understand that some
items can be moved around by holding the mouse down on them, and that they'll
get appropriate visual feedback when they're over a spot where the item can be
dropped. They expect to be able to move data and images from one spot to
another this way. You can control all aspects of the process, including which
controls allow dragging, what data they make available to drag, and where it
can be dropped. You can implement this both within a single application and
between applications.

Featured Highlights:

a) From a TextBox control to two other TextBox controls, one of which does not
have the AllowDrop property set to True, demonstrating how to prevent a drop on
a control.


The MouseDown event for the left TextBox. This event fires when the mouse is in the control's bounds and the mouse button is clicked.

Declare constant for use in detecting whether the Ctrl key was pressed during the drag operation.


const byte CtrlMask = 8;


private void TextBoxLeft_MouseDown(object sender,
System.Windows.Forms.MouseEventArgs e)

{

if (e.Button == MouseButtons.Left)

{

txtLeft.SelectAll();

//invoke the drag and drop operation

txtLeft.DoDragDrop(txtLeft.SelectedText, DragDropEffects.Move |
DragDropEffects.Copy);

}

}


// the DragDrop event for the lower right TextBox. This event fires

// when the mouse button is released, terminating the drag-and-drop
operation.


private void TextBoxLowerRight_DragDrop(object sender,
System.Windows.Forms.DragEventArgs e)

{

txtLowerRight.Text = e.Data.GetData(DataFormats.Text).ToString();

// if the Ctrl key was not pressed, remove the source text to effect a

// drag-and-drop move.


if ((e.KeyState & CtrlMask) != CtrlMask)

{

txtLeft.Text = "";

}

}


// the DragEnter event for the lower right TextBox. DragEnter is the

// event that fires when an object is dragged into the control's bounds.


private void TextBoxLowerRight_DragEnter(object sender,
System.Windows.Forms.DragEventArgs e)

{

// Check to be sure that the drag content is the correct type for this

// control. if not, reject the drop.


if (e.Data.GetDataPresent(DataFormats.Text))

{

// if the Ctrl key was pressed during the drag operation then perform a
Copy. if not, perform a Move.


if ((e.KeyState & CtrlMask) == CtrlMask)

{

e.Effect = DragDropEffects.Copy;

}

else

{

e.Effect = DragDropEffects.Move;

}

}

else

{

e.Effect = DragDropEffects.None;

}

}

Aug 3, 2009

Crystal Reports - Get data between two dates

Crystal Report to display records between fromdate and todate

1) First step is to make new parameters by right clicking on paramaters fields in field explorer.
Then click on New.


2) Now create a parameter called fromdate for start date


3) Similarly create a parameter called todate for end date


4) On form I have taken two datetimepicker controls for selecting from and to date


using System;
using System.Collections.Generic;
using System.ComponentModel;
using System.Data;
using System.Drawing;
using System.Text;
using System.Windows.Forms;
using System.Data.Odbc;
using CrystalDecisions.CrystalReports.Engine;
using CrystalDecisions.ReportSource;
using CrystalDecisions.Shared;
using CrystalDecisions.Windows.Forms;

namespace sampletest
{
public partial class frmReturnReceipt : Form
{
DataSet ReportDB;
String str = "";
String FromDate, ToDate;

private void frmReturnReceipt_Load(object sender, EventArgs e)
{
}

public void Set_Report_Dataset()
{
try
{
RR rptRR = new RR();
TableLogOnInfos crtableLogoninfos = new TableLogOnInfos();
TableLogOnInfo crtableLogoninfo = new TableLogOnInfo();
ConnectionInfo crConnectionInfo = new ConnectionInfo();
Tables CrTables;

ParameterFieldDefinitions crParameterFieldDefinitions ;
ParameterFieldDefinition crParameterFieldDefinition ;
ParameterValues crParameterValues = new ParameterValues();
ParameterDiscreteValue crParameterDiscreteValue = new ParameterDiscreteValue();

crParameterDiscreteValue.Value = dateTimePicker1.Value.ToString("yyyy-MM-dd");
crParameterFieldDefinitions = rptRR.DataDefinition.ParameterFields;
crParameterFieldDefinition = crParameterFieldDefinitions["fromdate"];
crParameterValues = crParameterFieldDefinition.CurrentValues;

crParameterValues.Clear();
crParameterValues.Add(crParameterDiscreteValue);
crParameterFieldDefinition.ApplyCurrentValues(crParameterValues);

crParameterDiscreteValue.Value = dateTimePicker2.Value.ToString("yyyy-MM-dd");
crParameterFieldDefinitions = rptRR.DataDefinition.ParameterFields;
crParameterFieldDefinition = crParameterFieldDefinitions["todate"];
crParameterValues = crParameterFieldDefinition.CurrentValues;

crParameterValues.Add(crParameterDiscreteValue);
crParameterFieldDefinition.ApplyCurrentValues(crParameterValues);

crConnectionInfo.ServerName = "servername";
crConnectionInfo.DatabaseName = "database_name";
crConnectionInfo.UserID = "username";
crConnectionInfo.Password = "password";

CrTables = rptRR.Database.Tables;
foreach (CrystalDecisions.CrystalReports.Engine.Table CrTable in CrTables)
{
crtableLogoninfo = CrTable.LogOnInfo;
crtableLogoninfo.ConnectionInfo = crConnectionInfo;
CrTable.ApplyLogOnInfo(crtableLogoninfo);
}
crystalReportViewer1.ReportSource = rptRR;
crystalReportViewer1.Refresh();
}
catch (Exception e1)
{
MessageBox.Show(e1.ToString());
}
}

private void btnpreview_Click(object sender, EventArgs e)
{
Set_Report_Dataset();
}
}
}

Aug 1, 2009

Add Group Count in Crystal Report - Using Summary Field

The following C# - Crystal Reports section describes how to add a summary field in the Crystal Reports .

Here in this section we are calculating the count of the records in group.

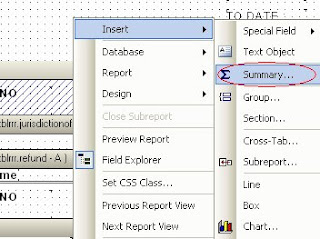
1. In the Crystal Reports designer view window, right click on the Report Footer , just below the Total field and select Insert -> Summary .


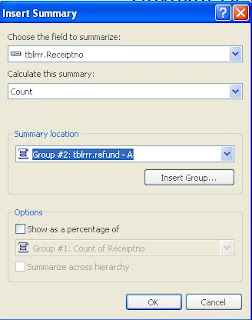
2.Then you will get a screen , select the tblrrr.Receiptno from the combo box and select Count from next Combo Box , and summary location Group #2:tblrrr.refund(In my case here which is my group name). Click Ok button


3. Now you can see CountofReceiptno1(which is circled) in the group section


Sample output :